General Information
Control. Power. Information. The 5th Generation (Gen) and new 6th Generation (Gen) Electronic Shift Selector from Allison puts it all at your fingertips. Literally. Getting started is easy and the selector's complete menu of prognostic and diagnostic tools minimize downtime and keep you on the job. Use this handy reference booklet for step-by-step instruction on how to get the most from your shift selector and of course, your Allison fully automatic transmission.
The Allison Advantage
Your Allison Automatic is controlled electronically. The Allison electronic controls package oversees the operation of the transmission, controlling transmission upshifts and downshifts, and providing important information on the operation of your drive system. Through readouts on your shift selector, you will be able to monitor transmission fluid levels, read diagnostic codes and prognostic information. This manual will help you understand shift selector readouts and enjoy long operation of your Allison Automatic.
Diagnostics
The Transmission Control Module (TCM) of your Allison Automatic monitors the transmission's electronic controls; and when a problem condition is detected, it:
- May restrict shifting
- Illuminates the CHECK TRANS* light on the instrument panel
- Registers a diagnostic code
Continued illumination of the CHECK TRANS light during vehicle operation (other than start-up) indicates that the TCM has signaled a diagnostic code.
* For some problems, diagnostic codes may be registered without the TCM activating the CHECK TRANS light. Your Allison Authorized Service Network should be consulted whenever there is a transmission-related concern, They have the equipment to check for diagnostic codes and to correct problems.
SHIFT SELECTOR OPERATION + FEATURES
Basic Operation
R - REVERSE N - NEUTRAL D - DRIVE
OEMs may supply shift selectors for some vehicles. If your vehicle is not equipped with an Allison-supplied shift selector; contact your OEM.
5th Gen Electronic Controls Shift Selectors
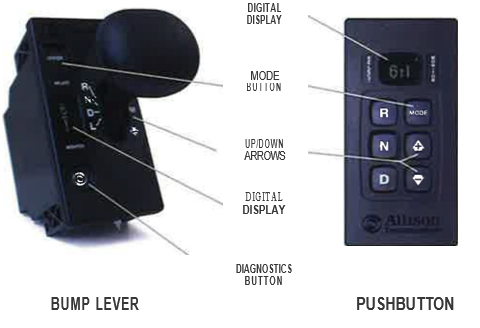
All 5th Gen Electronic Controls Shift Selectors feature easy-to-read graphic displays that show both text and symbols.
6th Gen Electronic Controls Shift Selectors
As a world leader in medium- and heavy-duty commercial transmissions, Allison Transmission continues its ongoing improvement initiative with the introduction of 6th Gen Electronic Controls Shift Selectors.

The 6th Gen Push Button Shift Selectors have been updated with hardware improvements to increase durability and in support of technoloqies such as cvbersecuritv and functional safetv (ISO 26262).
Mode Button
Allison Automatics offer primary and secondary shift schedule modes to enhance performance or fuel economy. The vehicle always defaults to the primary mode [MODE is not shown on graphic display]. If equipped as such you can switch to the secondary mode by pushing the MODE button [MODE is shown on graphic display].

Your vehicle may be equipped with FuelSense®2.0 with Dynactive® Shifting - Allison's next generation in fuel savings technology. FuelSense®2.0 is a set of unique packages of software and electronic controls. A FuelSense icon will appear at start-up if your vehicle utilizes a FuelSense® 2.0 package.
NOTE: Some vehicles are not equipped with prognostics and fluid level sensors, therefore not all features may be available.

Fluid Levels
The transmission fluid cools, lubricates and transmits hydraulic power, so it is important that the proper fluid level be maintained at all times. If the fluid level is too low, the converter and clutches do not receive an adequate supply of fluids. If the fluid level is too high, the fluid can aerate causing the transmission to shift erratically or overheat.
Checking Fluid Levels
Use the following procedure to display fluid level information.
To enter the fluid level function:
- Park the vehicle on a level surface, shift to N (NEUTRAL) and apply the parking brake.
- Using a pushbutton shift selector , simultaneously press the UP and DOWN arrows one time.
For a bump lever shift selector , press the DIAGNOSTICS button one time. - The fluid level reading will be delayed until the following conditions are met.
- Engine must be at idle.
- Transmission is in N (NEUTRAL) .
- Output speed must be zero.
- Fluid temperature must be between 104F (40C) and 220F (104C).
- Vehicle has been stationary for two minutes to allow the fluid

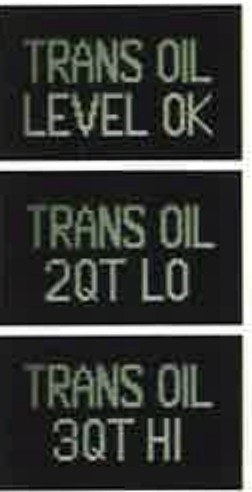
- The shift selector displays the fluid level data as follows:
- CORRECT FLUID LEVEL - The fluid is within the correct fluid level zone when OK is shown.
- LOW FLUID LEVEL - The display shows the number of quarts the transmission fluid is low.
- HIGH FLUID LEVEL - The display shows the number of quarts the transmission fluid is overfilled.
Delayed Fluid Level Check
If the fluid level check cannot be completed, one of the following fluid level status messages will be shown:

To exit the fluid level function:
- For pushbutton shift selector , press N (NEUTRAL) button.
- For bump lever shift selector , press the DIAGNOSTICS button until you return to range display
Prognostic Features

Shift Selectors display prognostics in text form to provide at-a-glance status of fluid life, filter life and transmission health.

The WRENCH ICON will illuminate briefly after you turn the key to the run position on your Allison-equipped vehicle to indicate that prognostics are enabled. If the WRENCH ICON remains on or flashes, this indicates there is a service issue relating to clutch, filter or fluid life.
Fluid Life Monitor
The status of the fluid life is displayed as a percentage (OIL LIFE 100%) until fluid is due for a change.
Filter Life Monitor
The status of filter life is displayed as OIL FILTERS OK and alerts when filters are due for a change with REPLACE FILTERS .
Transmission Health Monitor
The status of transmission health is displayed as OK or LO.

Accessing Prognostics
When you are alerted via the WRENCH ICON on the shift selector that service is due, you can check the status by toggling through the shift selector display as follows. Be sure to park the vehicle on a level surface, shift to N (NEUTRAL) and apply the parking brake before accessing prognostics through the shift selector.

Fluid Life Monitor
For a pushbutton shift selector , simultaneously press the UP and DOWN arrows two times.
For a bump lever shift selector , press the DIAGNOSTICS button two times.


Filter Life Monitor
For a pushbutton shift selector , simultaneously press the UP and DOWN arrows three times.
For a bump lever shift selector , press the DIAGNOSTICS button three times.


Transmission Health Monitor
For a pushbutton shift selector , simultaneously press the UP and DOWN arrows four times.
For a bump lever shift selector , press the DIAGNOSTICS button four times.

Resetting Prognostics
Fluid Life Monitor
For either a pushbutton or bump lever shift selector, press and hold the MODE button for approximately 10 seconds while in Fluid Life Monitor mode.

Or
For either a pushbutton or bump lever shift selector, perform the following shift sequence with the ignition on, but the engine off. Do not stop the sequence for more than three seconds once you have started.
N-D-N-D-N-R-N

Filter Life Monitor
For either a pushbutton or bump lever shift selector, press and hold the MODE button for approximately 10 seconds while in Filter Life Monitor mode.

Or
For either a pushbutton or bump lever shift selector, perform the following shift sequence with the ignition on, but the engine off. Do not stop the sequence for more than three seconds once you have started.
N-R-N-R-N-D-N
Transmission Health Monitor
This must be reset manually using Allison DOC® program after correcting a clutch system issue.
Exit Prognostics

For a pushbutton shift selector, press the N (NEUTRAL) range button.

For a bump lever shift selector, press the DIAGNOSTICS range button until back to range display.
Diagnostic Function
To enter the diagnostic code function:
- Bring the vehicle to a complete stop. Apply the parking brake.
- For a pushbutton shift selector, simultaneously press the UP and DOWN arrows five times.
For a bump lever shift selector , press the DIAGNOSTICS button five times. - Up to five codes may be recorded in memory

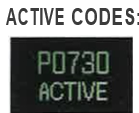
- Each code remains in the display until the MODE button is pushed, then the next code is shown. Active codes are shown first, newest to oldest, followed by any inactive codes still in the memory.
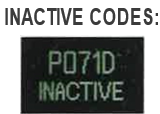
For a detailed list of Diagnostic Trouble Codes, see pages 9 through 14.
To exit the diagnostic code function:
Any of the following methods may be used.
- For a pushbutton shift selector, press the N (NEUTRAL) range button.
- For a bump lever shift selector, press the DIAGNOSTICS range button until back to range display.
- Wait approximately 1O minutes and the system will automatically return to normal operating mode.
- Turn off the vehicle engine ignition switch.


Drive the vehicle and check for code recurrence. If codes continue to recur, bring the vehicle to our Allison Authorized Service Network to diagnose and repair the problem causing the codes.
Additional Menu Item with 6th Gen Controls
To advance to the controls generation hardware level display:
For a pushbutton shift selector, simultaneously press the UP and DOWN arrows six times.
For a bump lever shift selector , press the DIAGNOSTICS button six times.


5th and 6th Gen Controls TCM and Shift Selector Compatibility Chart
| SELECTOR TYPE | 5TH GEN TCM | 6TH GEN TCM | FUNCTIONAL SAFETY | CYBER SECURITY |
|---|---|---|---|---|
| 4TH GEN SELECTORS | ||||
| 5TH GEN PUSH BUTTON SHIFT SELECTOR | ||||
| 5TH GEN BUMP LEVER SHIFT SELECTOR | ||||
| 5TH GEN STRIP | ||||
| 6TH GEN PUSH BUTTON SHIFT SELECTOR |


